Photography Blog
How to Clean Your Camera Sensor Safely at Home
Cleaning a camera sensor may feel risky at first. With suitable tools, careful preparation and the manufacturer’s instructions, however, basic cleaning can be completed safely.
Important: Sensor-cleaning procedures differ between camera models. Read your camera’s manual before exposing or touching the sensor area. Use only tools designed specifically for camera sensors, and take the camera to a professional service centre if you are uncertain about any part of the process.
If you enjoy photography, you already know how important it is to keep your camera in good condition. Cleaning the sensor can seem intimidating, but basic dust removal is often more straightforward than people expect.
With the correct tools and a careful process, you may be able to remove ordinary dust at home. Wet cleaning involves direct contact with the protective surface in front of the sensor, however, so it requires considerably more care than using the camera’s built-in cleaning function or a hand-operated air blower.
Why should you clean your camera sensor?
Dust on the sensor can appear as dark marks in your photographs, particularly in bright and uniform areas such as a clear sky or a light-coloured wall. The spots generally become more visible when you use a narrow aperture such as f/8, f/11 or f/16.
These marks can be removed during editing, but repeatedly correcting the same dust spots across many photographs quickly becomes frustrating. Beginning with a clean sensor saves time and produces cleaner original files.
When might your sensor need cleaning?
- You see marks that appear in the same position across several different photographs.
- You frequently change lenses, particularly outdoors or in dusty environments.
- The camera’s automatic sensor-cleaning function does not remove the visible spots.
- A hand-operated air blower removes some dust but several marks remain.
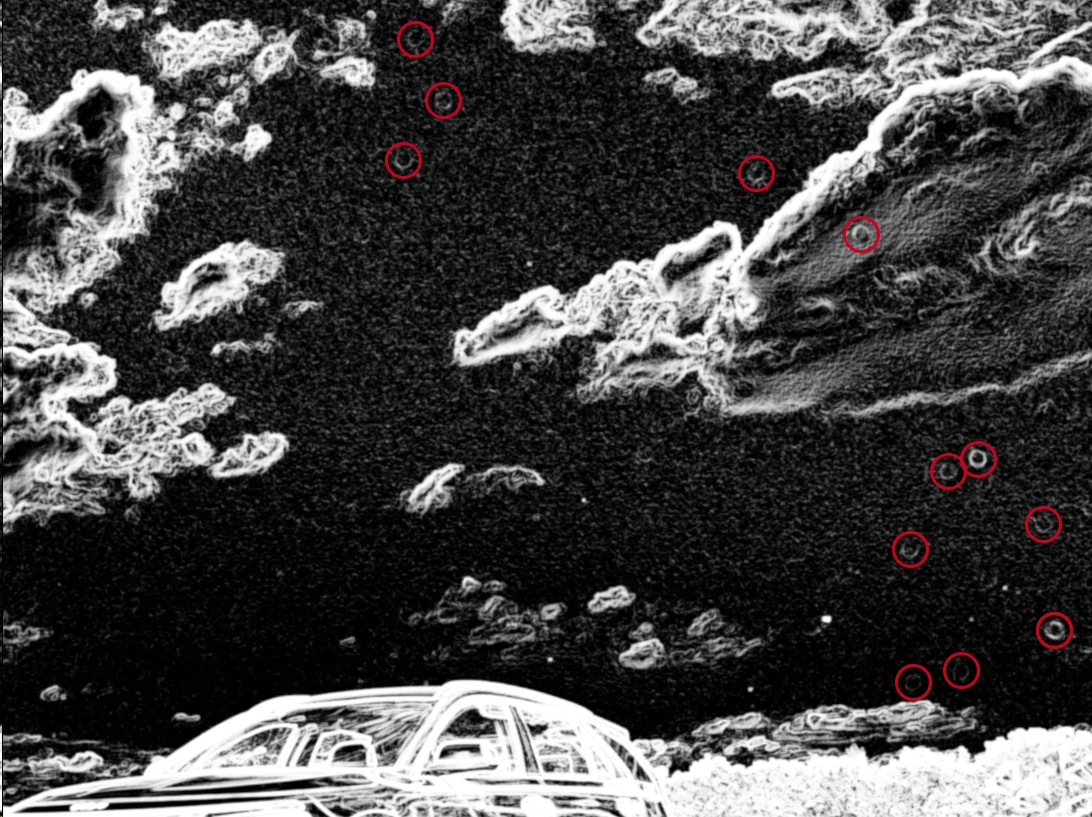
How to check for sensor dust in Lightroom Classic:
- Open the photograph in the Develop module.
- Select the Remove tool or press Q.
- Enable Visualize Spots.
In older versions of Lightroom Classic, the Visualize Spots option appears beneath the image preview when the toolbar is visible. Press T if the toolbar is hidden.
The preview may initially look chaotic, but repeated circular or irregular marks in clear parts of the image can reveal sensor dust.
Use a photograph taken at a relatively narrow aperture, such as f/8, f/11 or f/16. Dust spots become more clearly defined as the aperture becomes smaller.
What you will need
Gather the correct equipment before opening the camera. The following links are not affiliate links.
-
A hand-operated air blower: This is the first tool to use. It directs a controlled flow of air towards the sensor area and can remove loose dust without touching the surface.
Do not use canned or compressed air. It can release propellant, moisture or other residue and may produce far more pressure than the camera requires.
-
Sensor-cleaning fluid: Use only fluid specifically intended for cleaning camera sensors and compatible with your sensor and filter coating.
A kit containing suitable fluid and individually packaged swabs is often the simplest option. Apply only the amount specified by the manufacturer. Excess liquid can leave streaks or reach areas it should not enter.
-
Sensor-cleaning swabs: Purchase the size designed for your sensor format. A full-frame, APS-C and Micro Four Thirds sensor require differently sized swabs.
Use each swab only once. A used swab can collect particles and drag them back across the surface during another cleaning attempt.
- A sensor loupe or magnifier, optionally: This can make remaining particles easier to see before and after cleaning, although it is not essential.
- A clean working area: Choose a still, relatively dust-free room. Turn off fans and air conditioning and keep away from open windows while the camera body is exposed.
How to clean the sensor step by step
1. Prepare the camera and workspace
- Charge the battery fully: Some cameras need electrical power to keep the shutter open, mirror raised or stabilised sensor in the correct position. Losing power during cleaning could damage the camera.
- Read the camera manual: Use the cleaning mode or procedure specified for your exact model. Some cameras should remain switched on during cleaning, while others must be switched off. Do not assume that the same method applies to every camera.
- Clean the exterior first: Remove loose dust from the outside of the camera and around the lens mount before opening the body.
- Remove the lens carefully: Place the camera on a stable surface and remove the lens only when you are ready to begin.
2. Begin with the camera’s built-in cleaning function
Run the automatic sensor-cleaning function if your camera provides one. This uses vibration to dislodge loose dust and may solve the problem without exposing or touching the sensor area.
3. Use the hand-operated air blower
- Hold the camera with the mount facing down: This gives loosened particles a better chance of falling out of the body rather than settling elsewhere inside it.
- Keep the blower tip outside the lens mount: Never insert the nozzle deeply into the camera or allow it to touch the shutter, sensor area or internal components.
- Use several gentle bursts: Direct the air towards the sensor area without touching anything inside the camera.
Reattach the lens and create another test photograph before moving on to wet cleaning. If the marks have disappeared, there is no reason to touch the sensor surface.
4. Inspect the result
Photograph a bright, plain surface using a narrow aperture such as f/16. Focus manually at infinity, move the camera slightly during the exposure to blur the subject and inspect the resulting image for marks that remain in fixed positions.
You can also use a sensor loupe if you have one, although the test photograph usually gives a clearer indication of whether the dust is actually affecting your images.
5. Use a wet-cleaning kit only when necessary
Stop here if you are not confident. Persistent spots may be oil, pollen, moisture or material that requires professional cleaning. A service centre is cheaper than repairing a damaged shutter mechanism, stabilisation system or sensor assembly.
- Follow the camera manufacturer’s cleaning procedure: Activate the specified cleaning mode or power state before inserting a swab. Cameras with in-body image stabilisation require particular care because the sensor assembly can move.
- Prepare a new swab: Open the individually packaged swab immediately before use. Avoid touching the cleaning edge.
- Apply the specified amount of fluid: Follow the instructions supplied with the cleaning kit. This is normally only a very small amount. The swab should be lightly damp rather than wet.
- Make one smooth pass: Move the swab evenly from one side of the sensor to the other using only the gentle pressure recommended by the manufacturer.
- Use the clean side for the return pass: Turn the swab as instructed and make one pass in the opposite direction.
- Discard the swab: Never reuse it for another cleaning attempt. Use a new swab if another pass is required.
6. Test the camera again
- Reattach the lens without leaving the camera body open for longer than necessary.
- Create another test photograph of a bright, plain surface at approximately f/16.
- Inspect the image at a useful magnification rather than assuming every tiny mark visible at 400% requires another cleaning attempt.
- If obvious spots remain after one careful wet cleaning, arrange professional servicing rather than repeatedly rubbing the sensor area.
Tips for safer sensor cleaning
- Use as little contact as possible: Begin with the built-in cleaning function and air blower. Wet cleaning should be used only when loose dust removal is not enough.
- Use the correct equipment: Household cotton buds, tissues, brushes and general cleaning fluids are not suitable for a camera sensor.
- Work slowly: Prepare everything before removing the lens so the camera remains open for the shortest possible time.
- Do not repeatedly reuse a swab: Collected particles can scratch or smear the protective surface.
- Change lenses carefully: Turn the camera off when appropriate, keep the mount facing down and prepare the replacement lens before removing the current one.
- Know when to stop: Smears, oil spots, unusual marks or repeated cleaning failures are good reasons to use a professional service centre.
Final thoughts
Camera sensor cleaning does not always need to be difficult, but it does need to be approached carefully. Automatic cleaning and a hand-operated air blower are enough for many ordinary dust problems and involve no direct contact with the sensor area.
Wet cleaning can remove more persistent marks when it is performed with the correct swab, suitable fluid and the procedure specified for the exact camera model. When you are uncertain, professional cleaning remains the safest option.